Tuesday, March 27, 2018

Being honest to yourself is one of the biggest success mantra.

Being honest to yourself is one of the biggest success mantra.


This is all about my personal experience and I found being honest to myself is one of the biggest success mantra. Many times we plan to change our habits or we plan to achieve something and every time we comprise on them and we don’t achieve them by consoling ourselves that it is ok. This where we are not honest with us.

If we have to achieve success just follow 3 simple steps, after sometime you will wonder how things can be achieved.

1. Plan your carrier (clarity).
If you already have a carrier plan that is really great. If not, This won’t come by so easily, keep searching start looking around and start asking yourself what you want, you will find a moment where you will know what you want to be. Once you are ready don’t change this and be honest to yourself.
2. Plan your next 3, 6 months or an year based on what you want to achieve. I would say start with 3 months or even 1 month is also fine.

3. Chunk your goals to small parts so that some progress can be found every day. 
This is where actual test begins if you want succeed, you have to write down what you want to achieve every day either same day morning or previous day evening. At the end of the day make sure to revisit and check what you have completed and what you have not. Make sure to tick them right or wrong. I suggest use Red pen for wrong and blue for right.
You might fail to meet all your small goals everyday but eventually you will see that you will be able to finish everything on your daily activity list. This is possible only if you are honest to yourself and tick your goals right or wrong every day and include them in your next day activities. Don’t move to another activity as long as you don’t finish the one which you have not completed previous day.

That's it you might feel this is very simple, but practice them to see how difficult they are at the beginning and how great things can be achieved once you have built this habbit or created a pattern in your brain.

Don’t give up be honest is the mantra. 

Hope this is useful to someone. All the very best to everyone.

Sunday, March 25, 2018

How to enable Trace flag without restarting SQL Server immediately


How to enable Trace flag without restarting SQL Server immediately


Many times when DBA has to enable a Trace flag permanently we have to go to Customer and ask for a downtime or wait for monthly or quarterly agreed downtime. However we can avoid this wait time in two simple steps:

1. Enable Trace flag at global level with DBCC command as below.
DBCC TRACEON( 3226, -1) , this trace flag
helps not to log successful backup completions.
2. Add trace flag as startup parameter with help of -T and dont restart SQL Services.

When we restart Windows box or SQL Services during OS or SQL patching, trace flag enabled using -1 will get disabled at shutdown of SQL Services and Trace flag added part of startup parameter will take effect from SQL Server startup.

This is one of the short article, hope this finds helpful to someone. Stay tunned for more knowledge sharing.

Effective management of SQL Server logs and different ways to read them

Effective management of SQL Server logs and different ways to read them


Why do we need to manage SQL Server error logs efficiently?
Most important reason is readability, I have faced this situation many times while working with many SQL Server Instances. When we are trouble shooting SQL Server it is very hard go through many lines of logs which are useless, sometimes as DBA we would be working under time pressure.
Few things in SQL Server error log are useless bye default like successful logins (if you have enabled), Successful backups and deadlocks from SQL Server 2008 R2 onwards. Based on my experience it is always good to keep SQL Server logs short and quickly readable from notepad when SQL is down or not accessible. Here are few of the changes we need to implement:

    1. Enable Trace flag 3226, this helps not to log all successful backup completions.
This can enabled by adding -T3226 as start up parameter permanently. This requires down time for  SQL Server however we can avoid this, I will explain the steps in my another article.

    2. Dont enable Deadlock trace flags from SQL Server 2008 R2 onwards, as complete deadlock details are available as part of default System health Extended event. I will explain on How get deadlock details from this extended event in a separate article, I will post the link once it is ready.
  
    3. Last but not least recycle your error logs to keep them small and number of logs or length of the logs can be decided based on Customer requirements.

So far we have reviewed few of the setting those can help keep our SQL Server error log short and sweet, now we will see how to read SQL Server Error log.

SQL Server error log can be read with the help of XP_READERRORLOG or SP_READERRORLOG. My favorite is XP_READERRORLOG as it has more parameters. Details are below:


EXEC master.dbo.xp_readerrorlog 0, 1, null, null, null, null, N'desc'
1st parameter is for error log file number you want to read: 0 = current, 1 = Archive #1, 2 = Archive #2, etc...
2nd Parameter is for which log you want to read: 1 or NULL = error log, 2 = SQL Agent log
3rd Parameter is for 1st string you want to search on.
4th Parameter is for further fine tune your search, which means 4th parameter can be used to filter the output of 3rd or 1st string parameter.
5th Start date time in SQL Server error log.
6th End date time in SQL Server error log.
7th how do you want to sort your output based on date time of error log: N'asc' = ascending, N'desc' = descending.

SP_READERRORLOG error log internally uses XP_READERRORLOG however SP_READERRORLOG has limited number of parameters and they are:

1st parameter is for error log file number you want to read: 0 = current, 1 = Archive #1, 2 = Archive #2, etc...
2nd Parameter is for which log you want to read: 1 or NULL = error log, 2 = SQL Agent log
3rd Parameter is for 1st string you want to search on.
4th Parameter is for further fine tune your search, which means 4th parameter can be used to filter the output of 3rd or 1st string parameter.

Hope this article finds useful. Thanks for reading.

Friday, March 23, 2018

Database mirroring connection error 4 'An error occurred while receiving data: '10054(An existing connection was forcibly closed by the remote host.)

Database mirroring connection error 4 'An error occurred while receiving data: '10054(An existing connection was forcibly closed by the remote host.)


Recently while working on DR test, I have come across unknown issue. I could not find much help from google on this. This is regarding database mirroring and this should stand same for AlwaysON up to some extent as they both use Endpoints to communicate and service accounts for encrypting data over endpoints.

Problem description:
Part of the DR exercise we have disabled Mirroring on MSSQ 2014 databases and brought DR DB’s online. Post DR exercise when we try to re-establish mirroring we have started getting below error:

Primary logs:
2018-03-20 22:50:40.120 spid40s      Database mirroring connection error 4 'An error occurred while receiving data: '10054(An existing connection was forcibly closed by the remote host.)'.' for 'TCP://XX.XX.XX.XX:7077'.
2018-03-20 22:50:55.780 spid22s      Error: 1443, Severity: 16, State: 2.
As part of general trouble shooting I have stopped and started Endpoints on both servers no luck. Tried telnet from both servers everything was fine and no issues found.
Then tried researching error logs as they say for any issues a good troubleshooting will always start from SQL Server error logs. But in this case, we must check SQL Server error logs from both Primary and DR servers, as the issue is related to mirroring and we could not find any useful information from Primary.
When checked Mirror or DR server error logs surprisingly handshake errors were logged. This helped to find root cause the fix the issue.
Mirror logs:
2018-03-20 22:54:15.160 Logon        Database Mirroring login attempt failed with error: 'Connection handshake failed. An OS call failed: (80090311) 0x80090311(No authority could be contacted for authentication.). State 67.'.  [CLIENT: xx.xx.xx.x]
2018-03-20 22:54:20.200 Logon        Database Mirroring login attempt failed with error: 'Connection handshake failed. An OS call failed: (80090311) 0x80090311(No authority could be contacted for authentication.). State 67.'.  [CLIENT: xx.xx.xx.x]
2018-03-20 23:06:55.010 Logon        Error: 17806, Severity: 20, State: 14.
2018-03-20 23:06:55.010 Logon        SSPI handshake failed with error code 0x8009030c, state 14 while establishing a connection with integrated security; the connection has been closed. Reason: AcceptSecurityContext failed. The Windows error code indicates the cause of failure. The logon atte
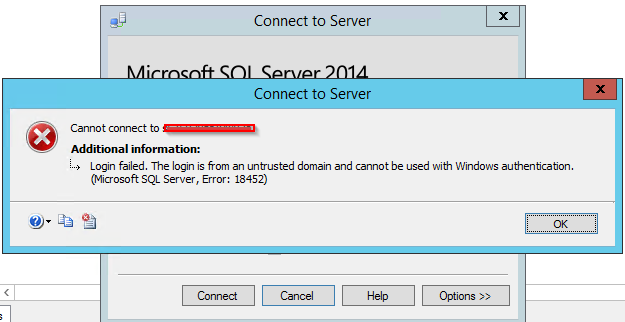
2018-03-20 23:06:55.010 Logon        Error: 18452, Severity: 14, State: 1.
2018-03-20 23:06:55.010 Logon        Login failed. The login is from an untrusted domain and cannot be used with Windows authentication. [CLIENT: xx.xx.xx.x]
Then logged to both servers using service accounts to make sure Service account is working fine. From Primary server both DB instances were accessible from DR server Primary instance was not accessible.


This gave a hint of confidence that I am on right path and helped to fix the issue.

Possible solutions are:
1.       If the service account password is changed make sure to update on both SQL Servers and restart the Services this should solve if issue is related to service account password.
2.       Sometimes this might not resolve the issue. If your hosted on complex domains like what happened in this case. Servers were hosted on different domain and service accounts used were from different domain. To fix this we have make sure proper trust is established between these two domains so that authenticity of the service account can be validated. This will be taken care by AD admins. This helped resolve the issue.

Hope this helps someone like me 😊.

Wednesday, October 12, 2011


Reboot required check fails while Installing SQL Server


Some times while installing new SQL Server installation or updating we get Reboot required check failed error, even after rebooting the server for several times we still receive the same error, after doing enough research and some google search came to know that it is due to the one of the registry key. Here are the steps to fix this issue hope this finds helpful:

1.       Go to run and type REGEDIT to open the registry editor.

2.       Navigate to HKEY_LOCAL_MACHINE\SYSTEM\CurrentControlSet\Control\Session Manager and locate registry key called PendingFileRenameOperations.

3.       Most of the times by reading the value in this key would give you clear information about what file rename is pending and you can take appropriate actions or you can save the information for feature references if you want and then clear the data in the key.

4.       Now reboot the machine and rerun the installation, if you still happen to face same issues you can go ahead and perform first 3 steps and this time install SQL Server without rebooting the system.

5.       One more simple workaround if you’re installing via command prompt you may use parameter /SkipRules=VSShellInstalledRule RebootRequiredCheck to ignore this reboot check.

Thursday, September 8, 2011

How to add user to sysadmin role or to any other fixed server role

We can add users to sysadmin role or to any fixed server role using T-SQL or using SSMS(SQL Server Management studio) here are the both:
1.       Using T-SQL method
--Create SQL user account Login
USE [master]
GO
CREATE LOGIN [tesuser] WITH PASSWORD=N'test@123', DEFAULT_DATABASE=[master], CHECK_EXPIRATION=OFF, CHECK_POLICY=OFF

--Create windows user account login
USE master
GO
CREATE LOGIN [DominName\Username] FROM WINDOWS WITH DEFAULT_DATABASE=[master], DEFAULT_LANGUAGE=[us_english]
Note: Keep in mind as it is for test purpose I have given simple password, in any live enviorment try and keep complex passwords and if your environment permits use Expiration and policy options with SQL users(Via Active directory we can set password policy for windows users) for better security.
--Add user to sysadmin role
USE master
GO
EXEC master..sp_addsrvrolemember @loginame = N'User Name', @rolename = N'sysadmin'
Note: user name can be SQL user or Window user.
2.       GUI Method
Go to SSMS in the object explorer right click on Security then click on New and then Login you will get following screen
                                              
Key in the login name based on Authentication type (Window or SQL) and password if your are creating SQL Server authenticated user and then click on the Server roles (you can see it on your left hand side) and select sysadmin(shown below) and click OK.

3.       We can test by using following query for accuracy.
SELECT
   spm.name AS 'User Name',
   spr.name AS 'Server Role'
FROM
   sys.server_role_members srm
INNER JOIN
   sys.server_principals spr
   ON spr.principal_id = srm.role_principal_id
INNER JOIN
   sys.server_principals spm
   ON spm.principal_id = srm.member_principal_id
WHERE spm.name = 'testuser'

Tuesday, August 30, 2011

Different Types of backups in SQL Server

  • Full Backup: It’s just full backup of database, it backs up all data and objects that reside in the database but it will not backup objects like jobs and SQL Server logins which don’t reside in database. With the versions prior to the SQL Server 2005, if you execute a full database backup, you could not make any other backups (such as transactional log backup), until the full database backup is completed. But SQL Server 2005 allows you to do two concurrent backups at the same time. If you exceed two the third backup will fail. It’s advised that not to use more than one backup at a time as it will use high disk I/O. Full backup dose not truncate or backup transactional log. Full backup process:
1.       When backup command is executed, SQL server locks the database, blocking all transactions and check points is issued on the database, which writes all deity pages to disk. This ensures that all committed transactions up to the point of backup command will be part of the full backup.
2.       SQL Server makes a mark in the transactional log to point where the full back begins. This is important in the recovery process; SQL Server will use this mark to help validate what combination of files can or cannot be used to restore the database from the full backup, releases lock on the database.
3.       The data is then read out of the database files to the backup files, which is plain text file that is create on disk or tape.
4.       Lock the database, blocking all transactions, and issues checkpoint.
5.       When full backup is completed SQL Server makes another mark in the transaction log.
6.       Release database lock.
7.       Extracts all transactions between the two log marks and append to the backup, by maintaining the consistency of backup for e.g., if someone modifies the data on the pages while backup process, and if he restores the backup he might lose the modified data.
  • Differential database backup: A differential database backup contains only the changes made to the database since the last full backup. The main purpose of differential backup is to reduce the number of transactional log backups that needed to be restored at the time of recovery.  A differential database backup is possible because SQL Server keeps track of the extents that have changed, in an internal bitmap contained within the data file. When the full backup is made bitmap is reset. One bit is used per extent, which is eight physical contiguous 8kb pages (i.e., extent is 8X8 = 64kb), so single 8kb page can map to about 4GB of data. SQL Server creates one of these mapping pages for every 8,192 extents.
  • Transactional log backup: it is a backup of your current transactional log; you can take transactional log back up only if you have taken full backup of the database at least once in its life time. Log backup starts at the log sequence (LSN) number at which previous log backup completed or if it is 1st log backup, it will start at which the full backup was completed. SQL Server then backs up all the subsequent transactions until the backup encounters an open transaction. Once SQL Server encounters the open transaction the log backup completes. Any LSN’s that are backed up will be removed from the transactional log, which enables system to reuse the log space. From recovery standpoint no backup is critical than transactional log backup because it allows you to recover more granular point in time. To apply a transactional log, your database must be restored WITH NORECOVERY or WITH STANDBY. WITH NORECOVERY puts your database in pure loading state where it cannot be used for client connection, but WITH STANDBY puts your database in loading state where clients can access your database in read-only mode, but when a transaction is loaded, the database needs exclusive access to load the log, so it would be unavailable for clients use. Need to read more in page no. 43
  • File and File group backup: File and file group backups are based on the full and differential backups, if your database architecture uses multiple files and file groups, although you can do a standard full or differential backup, you now have the option of doing backups on files or file groups which will make recovery much easier. Although you can do file or file group backup from full or differential backup, the advantage of file or file group backup is when we are doing backup of multi terabyte databases.
  • Partial backup: It possible that some of the file groups in SQL Server database as read only and some of them both (read/write). In previous versions of SQL Server, a full backup captures all extents even if the file group is marker as read only, which meant that there were no changes to the data. SQL Server 2005 introduces a new parameter to the backup command to handle this situation. The READ_WRITE_FILEGROUPS clause causes the backup engine to skip any file groups that are marked as read only, saving time and space in the backup by having the backup engine gather only the set of extents that could change. E.g., BACKUP DATABASE PUBS READ_WRITE_FILEGROUPS TO DISK='C:\DEMO\BACKUP\PUBS1.BAK'
  • Mirror Backup: this is a new feature from SQL Server 2005 onwards, it is the ability to mirror your backup media.
Media Retention: It an instance level option where we can set how long SQL Server can retain backup set. Retaining means within SQL Server you cannot delete it (but it will not prevent doing anything physically on your media) this option is media retention and is considered an advanced configuration option within SQL Server. It is set in days, and the values can be from 0 (the default) to 365.

Configure a Linux Service to Start Automatically After a Crash or Reboot

Configure a Linux Service to Start Automatically After a Crash or Reboot Below articles defines how to start a service automatically after ...